Tutorial - Quest System in Unity
This tutorial will be covering a quest system that I have personally used for several projects now.
The Quest System will be using events to trigger when completed. The idea is that a quest is set up with
multiple quest components. A component is essentially the quest objective, for instance, killing an enemy or collecting an item.
The system will be using Scriptable Objects to allow for easy quest creation once the system is complete.
If you have any suggestions on how to approach this better or how to optimise this system, please send me an email. I would love to discuss this!
Setting up the Quest class
Firstly, we create the classes necessary to set up the Quest itself. The following classes needed are: Quest.cs and QuestComponent.cs
-
Quest.cs
using System;
using System.Collections.Generic;

namespace QuestSystem
{
    public enum QuestStatus { Inactive, Active, Completed };
    // Inactive     - Quest has not been started
    // Active       - Quest is current in progress
    // Completed    - Quest has been completed

    public class Quest
    {
        public event Action<Quest> OnQuestCompleted;

        public readonly string QuestName;
        public int QuestID;
        public QuestStatus QuestStatus;
        public List<QuestComponent> QuestComponents = new List<QuestComponent>();

        public Quest(string name, int id)
        {
            QuestName = name;
            QuestID = id;
            QuestStatus = QuestStatus.Inactive;
        }
    }
}
The Quest class will keep track of the quest's components and its active state. It will not be updating anything itself and will only serve as a holder for all components. We start off by giving the basic information that we need; the name, id, status, & the list of components. The list will be populated later.
-
QuestComponent.cs
using System;
using UnityEngine;

namespace QuestSystem
{
    public abstract class QuestComponent
    {
        public enum QuestComponentType
        {
            EnemyKilled,
            ItemCollected
            // ADD CUSTOM TYPES BELOW
        }

        public event Action<QuestComponent> OnComponentCompleted;
        protected void TriggerComponentCompleted(QuestComponent questComponent) { OnComponentCompleted?.Invoke(questComponent); }

        public string ComponentName;
        public string ComponentDescription;
        public QuestComponentType ComponentType;

        public QuestComponent(string name, string description)
        {
            ComponentName = name;
            ComponentDescription = description;
        }

        public virtual void EnableComponent()
        {
            Debug.unityLogger.Log($"{ComponentName} has been enabled.");
        }

        public virtual void MarkCompleted()
        {
            Debug.unityLogger.Log($"{ComponentName} has been completed.");
        }
    }
}
The component class will be marked as abstract since the idea is that we will be creating a new class for every component type. This way, we can set up necessary events for each action required. In this example, we will be focusing on EnemyKilled and ItemCollected. two common gameplay mechanics that may be part of quests.
Creating Data in The Editor
To create quests easily, we will be taking advantage of scriptable objects. Start by creating two classes: SO_Quest and SO_QuestComponent. Both of these classes are fairly simple as all they do is contain the initial data. SO_QuestComponent will later be overwritten by each component.
-
SO_Quest.cs
using System.Collections.Generic;
using UnityEngine;

namespace QuestSystem
{
    [CreateAssetMenu(fileName = "Quest", menuName = "QuestSystem/Quest", order = 0)]
    public class SO_Quest : ScriptableObject
    {
        public string questName;
        public int id;
        public List<SO_QuestComponent> components;
    }
}
-
SO_QuestComponent.cs
using UnityEngine;

namespace QuestSystem
{
    public abstract class SO_QuestComponent : ScriptableObject
    {
        [Header("Component Settings")]
        public string componentName;
        public QuestComponent.QuestComponentType questType;
        [TextArea(2, 10)]
        public string description;
    }
}
Before we can create any quest components in the editor, we must first create a quest component. For now, let's focus on EnemyKilled. Create a new class called QC_EnemyKilled and another called SO_QC_EnemyKilled (QC standing for QuestComponent). The class will be populated with the variables required to track a certain enemy (in this instance using int ids) and the count of enemies killed. We will focus on how to detect enemies killed later on.
-
QC_EnemyKilled.cs
using UnityEngine;

namespace QuestSystem
{
    public class QC_EnemyKilled : QuestComponent
    {
        private int _enemyID;
        private int _killCount;
        private int _killsNeeded;

        public QC_EnemyKilled(string name, string description, int enemyID, int killsNeeded) : base(name, description)
        {
            _enemyID = enemyID;
            _killsNeeded = killsNeeded;
            _killCount = 0;
            ComponentType = QuestComponentType.EnemyKilled;
        }

        public override void EnableComponent()
        {
            base.EnableComponent();
            // Subscribe to enemy kill event
        }

        public override void MarkCompleted()
        {
            base.MarkCompleted();
            // Unsubscribe from enemy kill event
        }
    }
}
-
SO_QC_EnemyKilled.cs
using UnityEngine;

namespace QuestSystem
{
    [CreateAssetMenu(fileName = "QC_EnemyKilled", menuName = "QuestSystem/Components/QC_EnemyKilled", order = 1)]
    public class SO_QC_EnemyKilled : SO_QuestComponent
    {
        [Header("Enemy Settings")]
        public int enemyID;
        public int killsNeeded;
    }
}
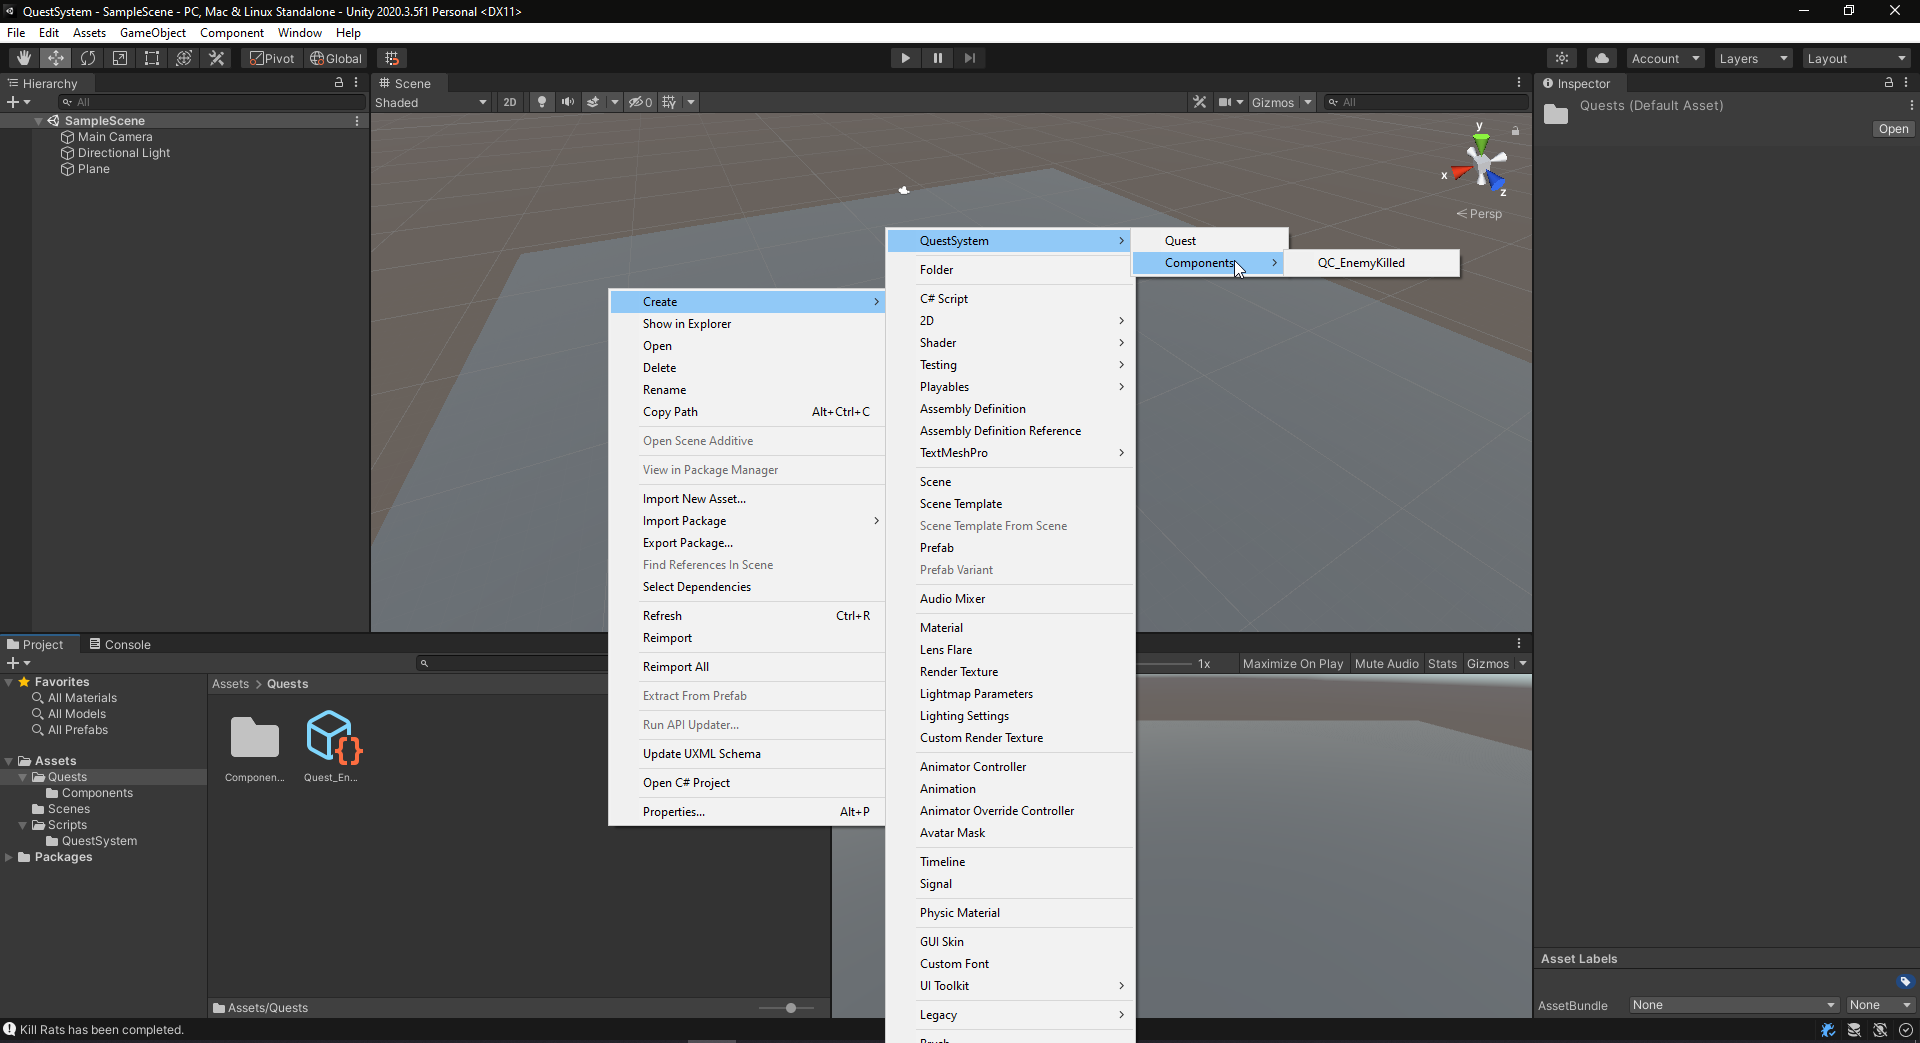
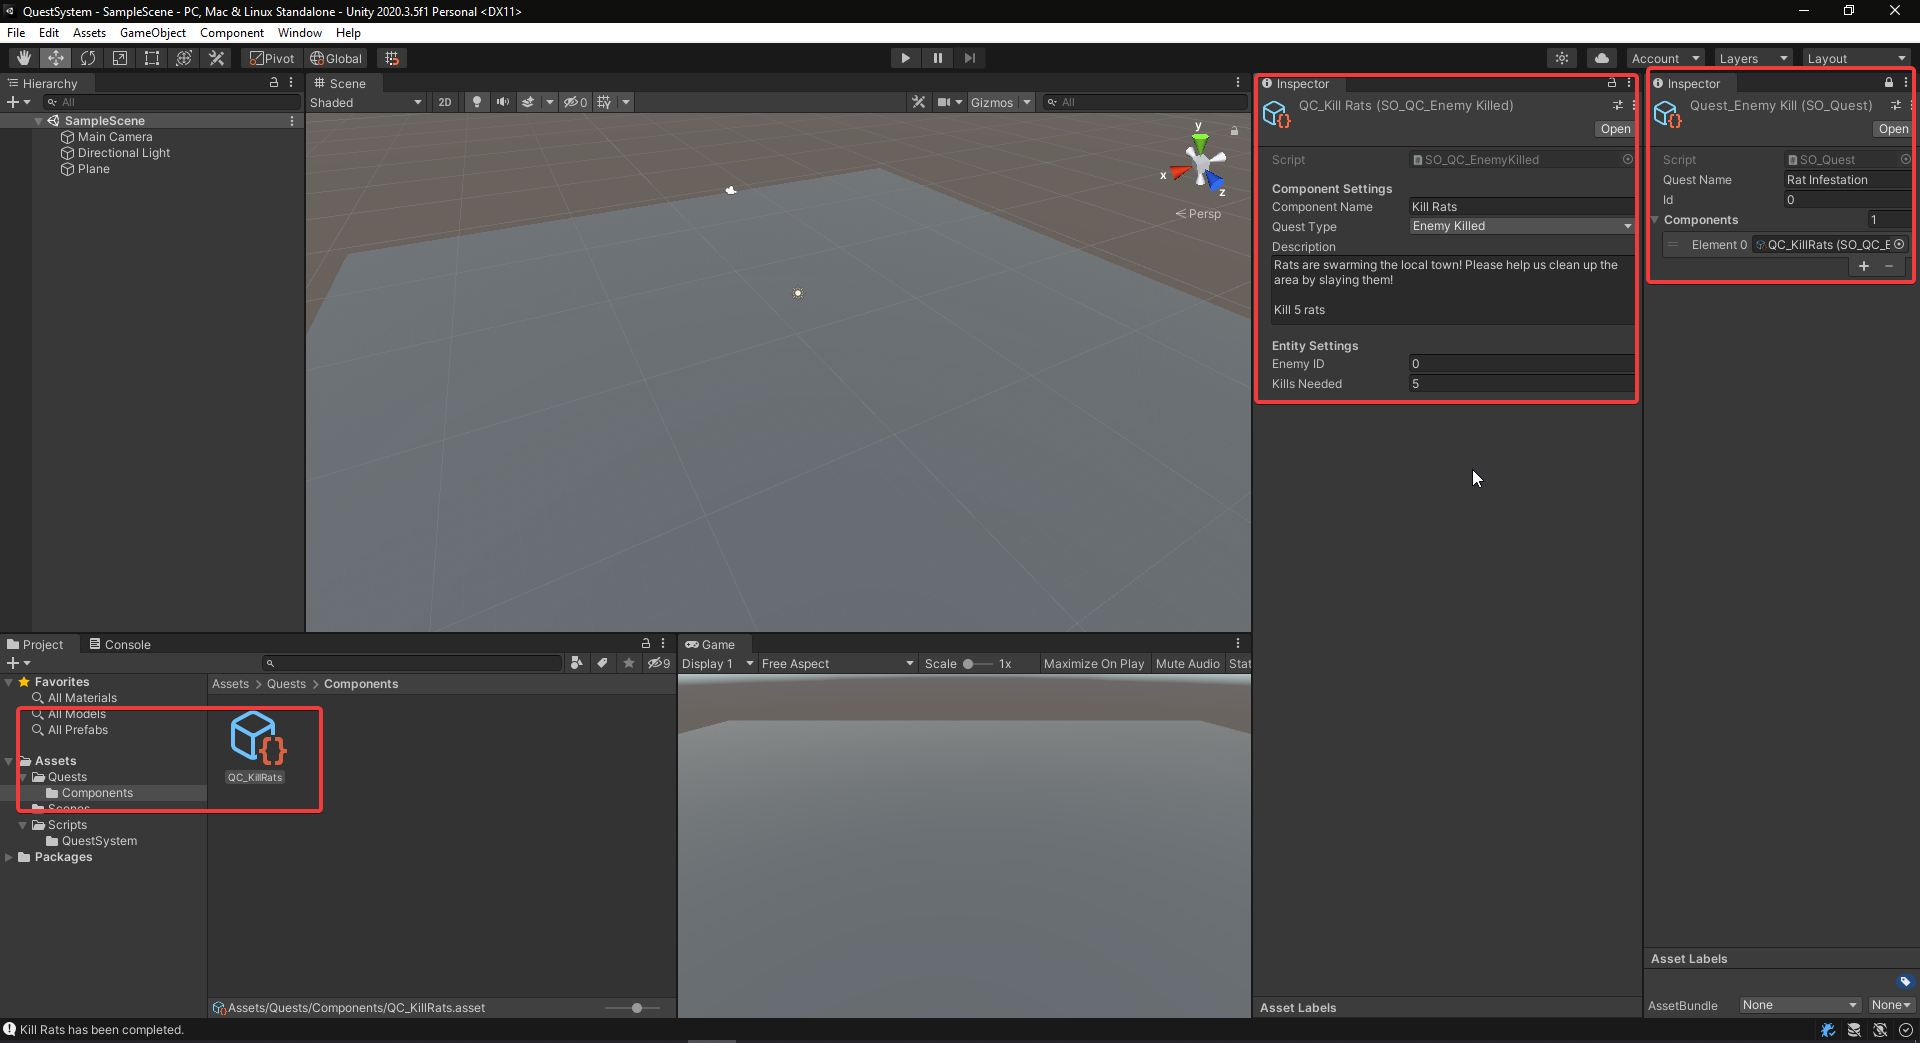
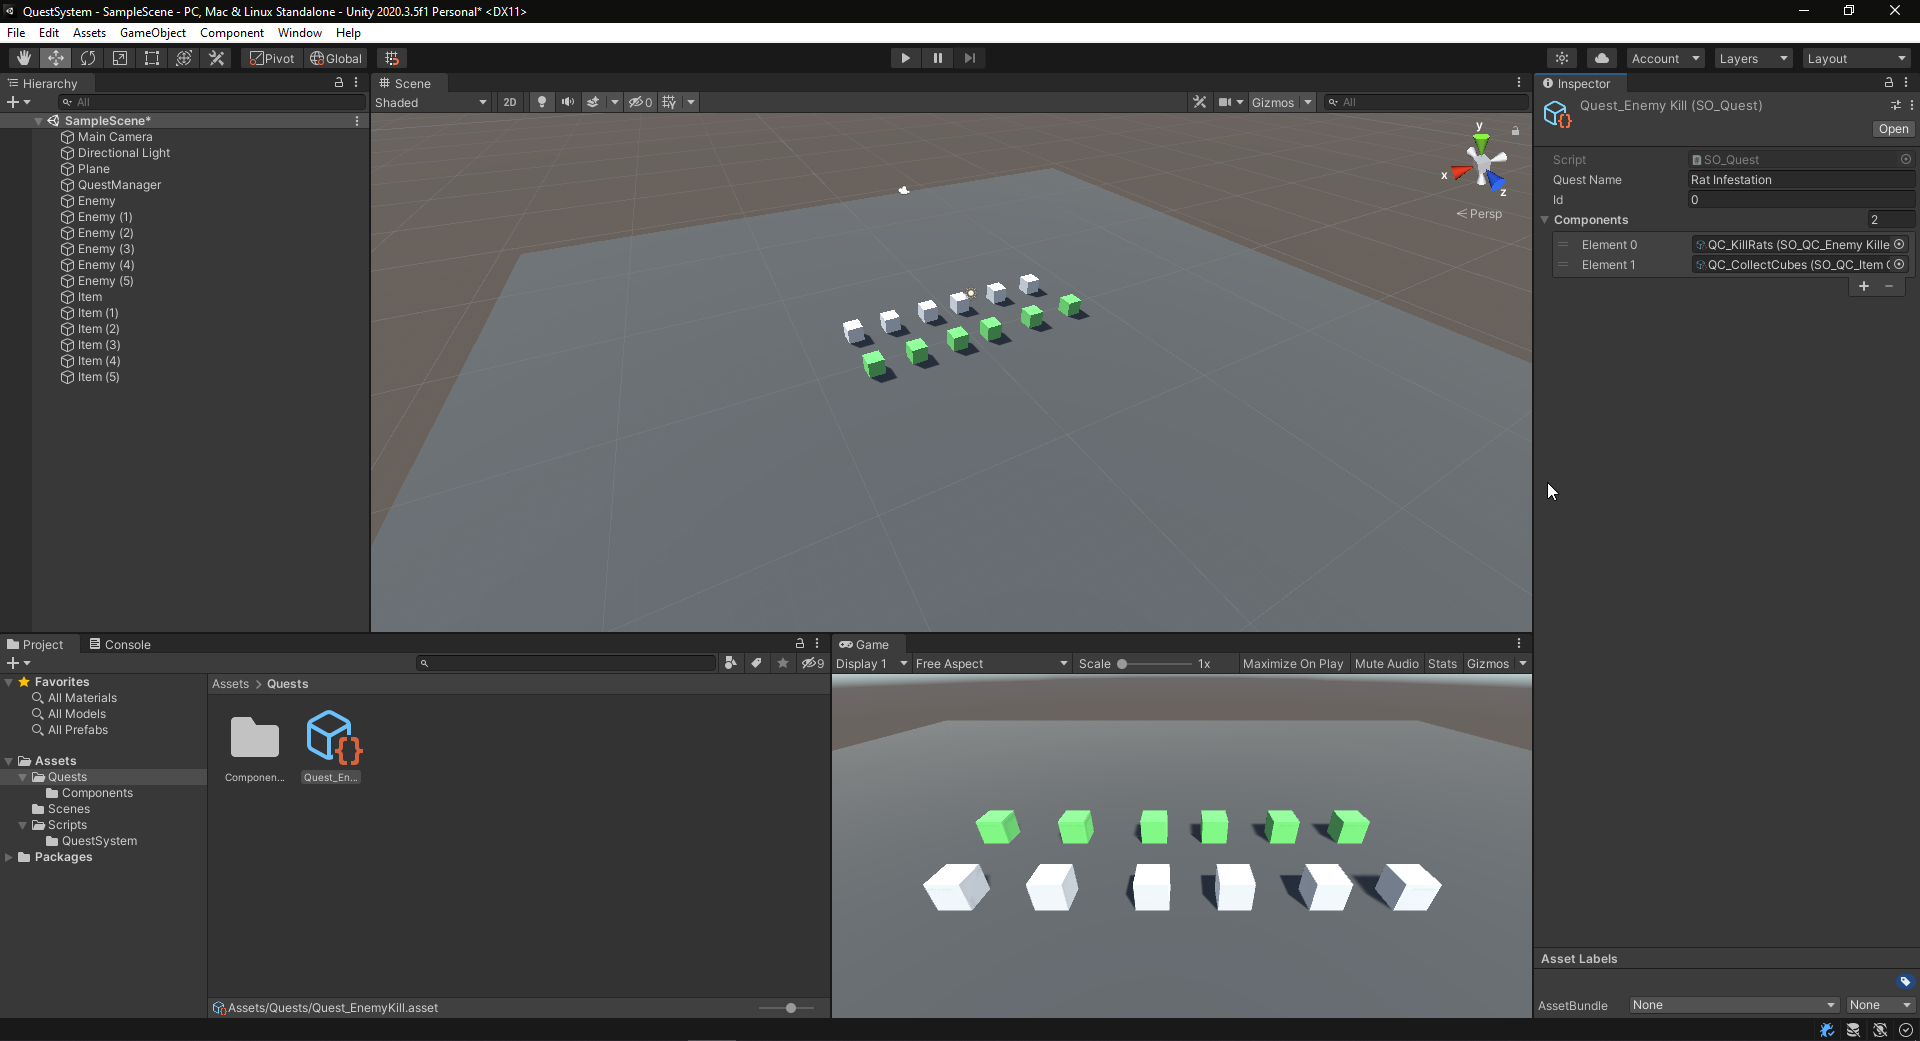
With the basic implementation of a quest and components created, we are ready to set up the events and components. Before that though, we will need to create the data in the editor. Create a new folder somewhere within the assets folder called Quests. In there, create two scriptable objects: A quest and a quest component of type EnemyKilled.
Make sure to set up the scriptable objects to match the images above. You can obviously get as creative as you want to. I opted for rats because it's never been done before in games... I know! What an exciting quest.
Registering Quest Components & Events
Since we now have access to custom quest components, we can finally register them inside of our quests!
We start by looping through the list of components in our scriptable object. To do this, open Quest.cs where we can now, using the factory pattern create a quest component based on the type received from the scriptable object. We are going to modify the script to add the factory and the initialization of the components. We will also have to modify QC_EnemyKilled to implement the factory.
-
Quest.cs
using System; using System.Collections.Generic; namespace QuestSystem { public enum QuestStatus { Inactive, Active, Completed }; // Inactive - Quest has not been started // Active - Quest is current in progress // Completed - Quest has been completed public class Quest { public event ActionOnQuestCompleted; public readonly string QuestName; public int QuestID; public QuestStatus QuestStatus; public List<QuestComponent> QuestComponents = new List (); private readonly Dictionary<QuestComponent.QuestComponentType, System.Func<SO_QuestComponent, QuestComponent>> _componentFactory = new Dictionary<QuestComponent.QuestComponentType, Func<SO_QuestComponent, QuestComponent>>() { { QuestComponent.QuestComponentType.EnemyKilled, QC_EnemyKilled.CreateFactory } }; public Quest(string name, int id, List questComponents) { QuestName = name; QuestID = id; QuestStatus = QuestStatus.Inactive; if (questComponents.Count <= 0) return; foreach (SO_QuestComponent questComponent in questComponents) { QuestComponent qcTemp = null; if (_componentFactory.ContainsKey(questComponent.questType)) qcTemp = _componentFactory[questComponent.questType](questComponent); if (qcTemp == null) return; QuestComponents.Add(qcTemp); } } } }
-
QC_EnemyKilled.cs
using UnityEngine;

namespace QuestSystem
{
    public class QC_EnemyKilled : QuestComponent
    {
        private int _enemyID;
        private int _killCount;
        private int _killsNeeded;

        public QC_EnemyKilled(string name, string description, int enemyID, int killsNeeded) : base(name, description)
        {
            _enemyID = enemyID;
            _killsNeeded = killsNeeded;
            _killCount = 0;
            ComponentType = QuestComponentType.EnemyKilled;
        }

        public static QuestComponent CreateFactory(SO_QuestComponent so_questComponent)
        {
            SO_QC_EnemyKilled localQuestComponent = (SO_QC_EnemyKilled)so_questComponent;

            return new QC_EnemyKilled(
                localQuestComponent.componentName,
                localQuestComponent.description,
                localQuestComponent.enemyID,
                localQuestComponent.killsNeeded);
        }

        public override void EnableComponent()
        {
            base.EnableComponent();
            // Subscribe to enemy kill event
        }

        public override void MarkCompleted()
        {
            base.MarkCompleted();
            // Unsubscribe from enemy kill event
        }
    }
}
Since we are already inside of the Quest class, we can also deal with what happens when a component has been completed.
Add the following code to the Quest.cs class. Make sure to include the new global variable _componentsCompleted.
-
Quest.cs
using System; using System.Collections.Generic; using UnityEngine; namespace QuestSystem { public enum QuestStatus { Inactive, Active, Completed }; // Inactive - Quest has not been started // Active - Quest is current in progress // Completed - Quest has been completed public class Quest { public event Action<Quest> OnQuestCompleted; public readonly string QuestName; public int QuestID; public QuestStatus QuestStatus; public List<QuestComponent> QuestComponents = new List<QuestComponent>(); private int _componentsCompleted; private readonly Dictionary<QuestComponent.QuestComponentType, System.Func<SO_QuestComponent, QuestComponent>> _componentFactory = new Dictionary<QuestComponent.QuestComponentType, Func<SO_QuestComponent, QuestComponent>>() { { QuestComponent.QuestComponentType.EnemyKilled, QC_EnemyKilled.CreateFactory } }; public Quest(string name, int id, ListquestComponents) { QuestName = name; QuestID = id; QuestStatus = QuestStatus.Inactive; // Don't continue if no components are added to the list if (questComponents.Count <= 0) return; foreach (SO_QuestComponent questComponent in questComponents) { QuestComponent qcTemp = null; if (_componentFactory.ContainsKey(questComponent.questType)) qcTemp = _componentFactory[questComponent.questType](questComponent); if (qcTemp == null) return; QuestComponents.Add(qcTemp); // Subscribe to the component so that the Quest knows when the component has been completed. qcTemp.OnComponentCompleted += ComponentCompleted; } } ~Quest() { // Unsubscribe all components from the onComponentComplete event for (int i = QuestComponents.Count - 1; i >= 0; i--) { QuestComponents[i].OnComponentCompleted -= ComponentCompleted; QuestComponents[i] = null; } } private void ComponentCompleted(QuestComponent questComponent) { _componentsCompleted++; Debug.unityLogger.Log($"{QuestName}: Component '{questComponent.ComponentName}' was completed"); if (_componentsCompleted == QuestComponents.Count) { // Quest has been completed QuestStatus = QuestStatus.Completed; OnQuestCompleted?.Invoke(this); } else { // Enable next component if (QuestComponents.Count > _componentsCompleted) QuestComponents[_componentsCompleted].EnableComponent(); } } } }
In order for the component to tie itself together with gameplay, we need an event for the component to subscribe to. For this example,
I have gone ahead and created a new class called QuestEvents.cs where we can insert all static quest-related events such as enemies killed.
This is where you can tie your own systems/events into the component. Remember, this is just an example!
-
QuestEvents.cs
using System;

namespace QuestSystem
{
    public static class QuestEvents
    {
        public static event Action<int> OnEnemyKilled;
        public static void TriggerEnemyKilled(int enemyID) { OnEnemyKilled?.Invoke(enemyID); }
    }
}
Using this static event, we can update the EnemyKilled component when needed. We subscribe to the event and update the data needed.
Once we have reached the amount of kills needed, we mark the component as completed.
-
QC_EnemyKilled.cs
using UnityEngine;

namespace QuestSystem
{
    public class QC_EnemyKilled : QuestComponent
    {
        private int _enemyID;
        private int _killCount;
        private int _killsNeeded;

        public QC_EnemyKilled(string name, string description, int enemyID, int killsNeeded) : base(name, description)
        {
            _enemyID = enemyID;
            _killsNeeded = killsNeeded;
            _killCount = 0;
            ComponentType = QuestComponentType.EnemyKilled;
        }

        public static QuestComponent CreateFactory(SO_QuestComponent so_questComponent)
        {
            SO_QC_EnemyKilled localQuestComponent = (SO_QC_EnemyKilled)so_questComponent;

            return new QC_EnemyKilled(
                localQuestComponent.componentName,
                localQuestComponent.description,
                localQuestComponent.enemyID,
                localQuestComponent.killsNeeded);
        }

        public override void EnableComponent()
        {
            base.EnableComponent();
            // Subscribe to enemy kill event
            QuestEvents.OnEnemyKilled += EnemyKilled;
        }

        public override void MarkCompleted()
        {
            base.MarkCompleted();
            // Unsubscribe from enemy kill event
            QuestEvents.OnEnemyKilled -= EnemyKilled;
        }

        private void EnemyKilled(int enemyID)
        {
            if (_enemyID != enemyID)
                return;

            _killCount++;

            Debug.unityLogger.Log($"{ComponentName}: Enemy Type {enemyID} was killed {_killCount}/{_killsNeeded}");

            if (_killCount < _killsNeeded)
                return;

            MarkCompleted();
            TriggerComponentCompleted(this);
        }
    }
}
We're almost there! I promise :D
Starting Quests
One thing that I left out was the ability to start a quest. This function really depends on what sort of quest system you are aiming for.
The way I usually set up my quest and components is that once you have completed one component, the next enables (as seen in Quest.cs). Some games feature
quests where two components are enabled at the same time (such as kill and collect items). If you wish to create a quest like that,
simply enable the required components when you start the quest. In this example, starting a quest will enable the first component.
Start by adding the following method to Quest.cs.
public void Activate()
{
    if (QuestComponents.Count < 1) return;

    QuestComponents[0].EnableComponent();
    QuestStatus = QuestStatus.Active;
}
Next up, we need a way to control the quests in the game, keep track of completed ones, and so on. This example will use a simple approach that initializes all quests when the game is started.
Start by creating a class called QuestManager.cs. In there, we can store all quests and add functionality for starting quests.
In this example, I have let the QuestManager start the first quest in the list. This could be changed to instead use events on NPCs or such.
-
QuestManager.cs
using System.Collections.Generic;
using UnityEngine;

namespace QuestSystem
{
    public class QuestManager : MonoBehaviour
    {
        [SerializeField] private List<SO_Quest> questsToLoad = new List<SO_Quest>();

        public Dictionary<int, Quest> Quests;

        private void Awake()
        {
            InitializeQuests();
        }

        private void Start()
        {
            // For now, simply start the first quest :D
            StartQuest(0);
        }

        public bool StartQuest(int id)
        {
            if (!Quests.ContainsKey(id)) return false;
            if (Quests[id].QuestStatus != QuestStatus.Inactive) return false;

            Quests[id].Activate();
            Quests[id].OnQuestCompleted += QuestCompleted;

            Debug.unityLogger.Log($"{Quests[id].QuestName} has been started");
            return true;
        }

        private void QuestCompleted(Quest quest)
        {
            Debug.unityLogger.Log($"{quest.QuestName} has been completed");
            quest.OnQuestCompleted -= QuestCompleted;

            QuestEvents.TriggerQuestCompleted(quest);
        }

        private void InitializeQuests()
        {
            if (questsToLoad.Count <= 0) return;

            Quests = new Dictionary<int, Quest>();

            for (var i = 0; i < questsToLoad.Count; i++)
            {
                SO_Quest questToLoad = questsToLoad[i];
                Quest quest = new Quest(questToLoad.questName, questToLoad.id, questToLoad.components);
                Quests.Add(quest.QuestID, quest);

                Debug.unityLogger.Log($"{quest.QuestName} has been initialized");
            }
        }
    }
}
As seen above, there is a new event inside of QuestEvents.cs called OnQuestCompleted. This can be used to reward the player with items, display UI, or even kill them if you're mean ;)
public static event Action<Quest> OnQuestCompleted;
public static void TriggerQuestCompleted(Quest quest) { OnQuestCompleted?.Invoke(quest); }
Finally, we can test our quests! I've thrown together a little script to trigger the enemy event when you click a GameObject with a collider in the scene.
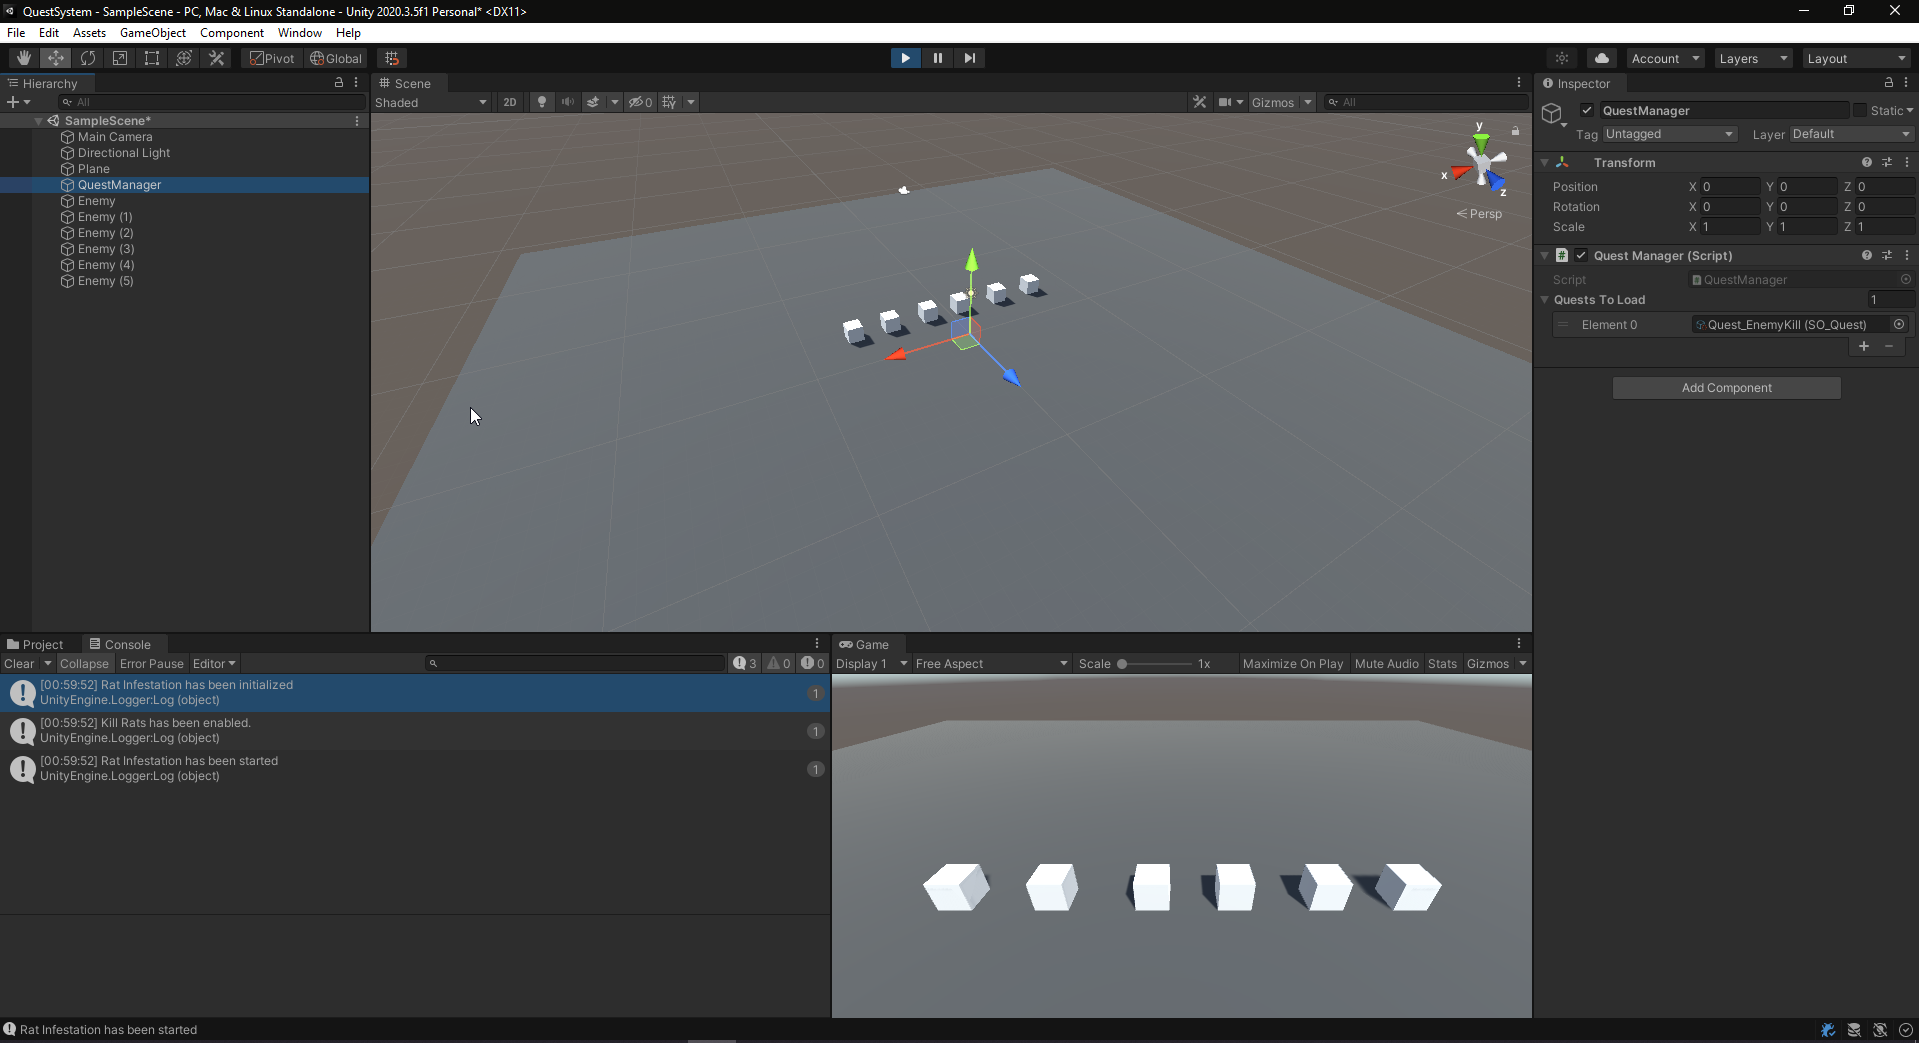
Make sure to create a new GameObject and add QuestManager.cs to it. Afterward, set up the list of quests to load and hit play.
I have also included the example of clicking the enemy below if you wish to test it as well.
-
Enemy.cs
using QuestSystem;
using UnityEngine;

public class Enemy : MonoBehaviour
{
    [SerializeField] private int enemyID;

    private void OnMouseDown()
    {
        QuestEvents.TriggerEnemyKilled(enemyID);
        Destroy(gameObject);
    }
}
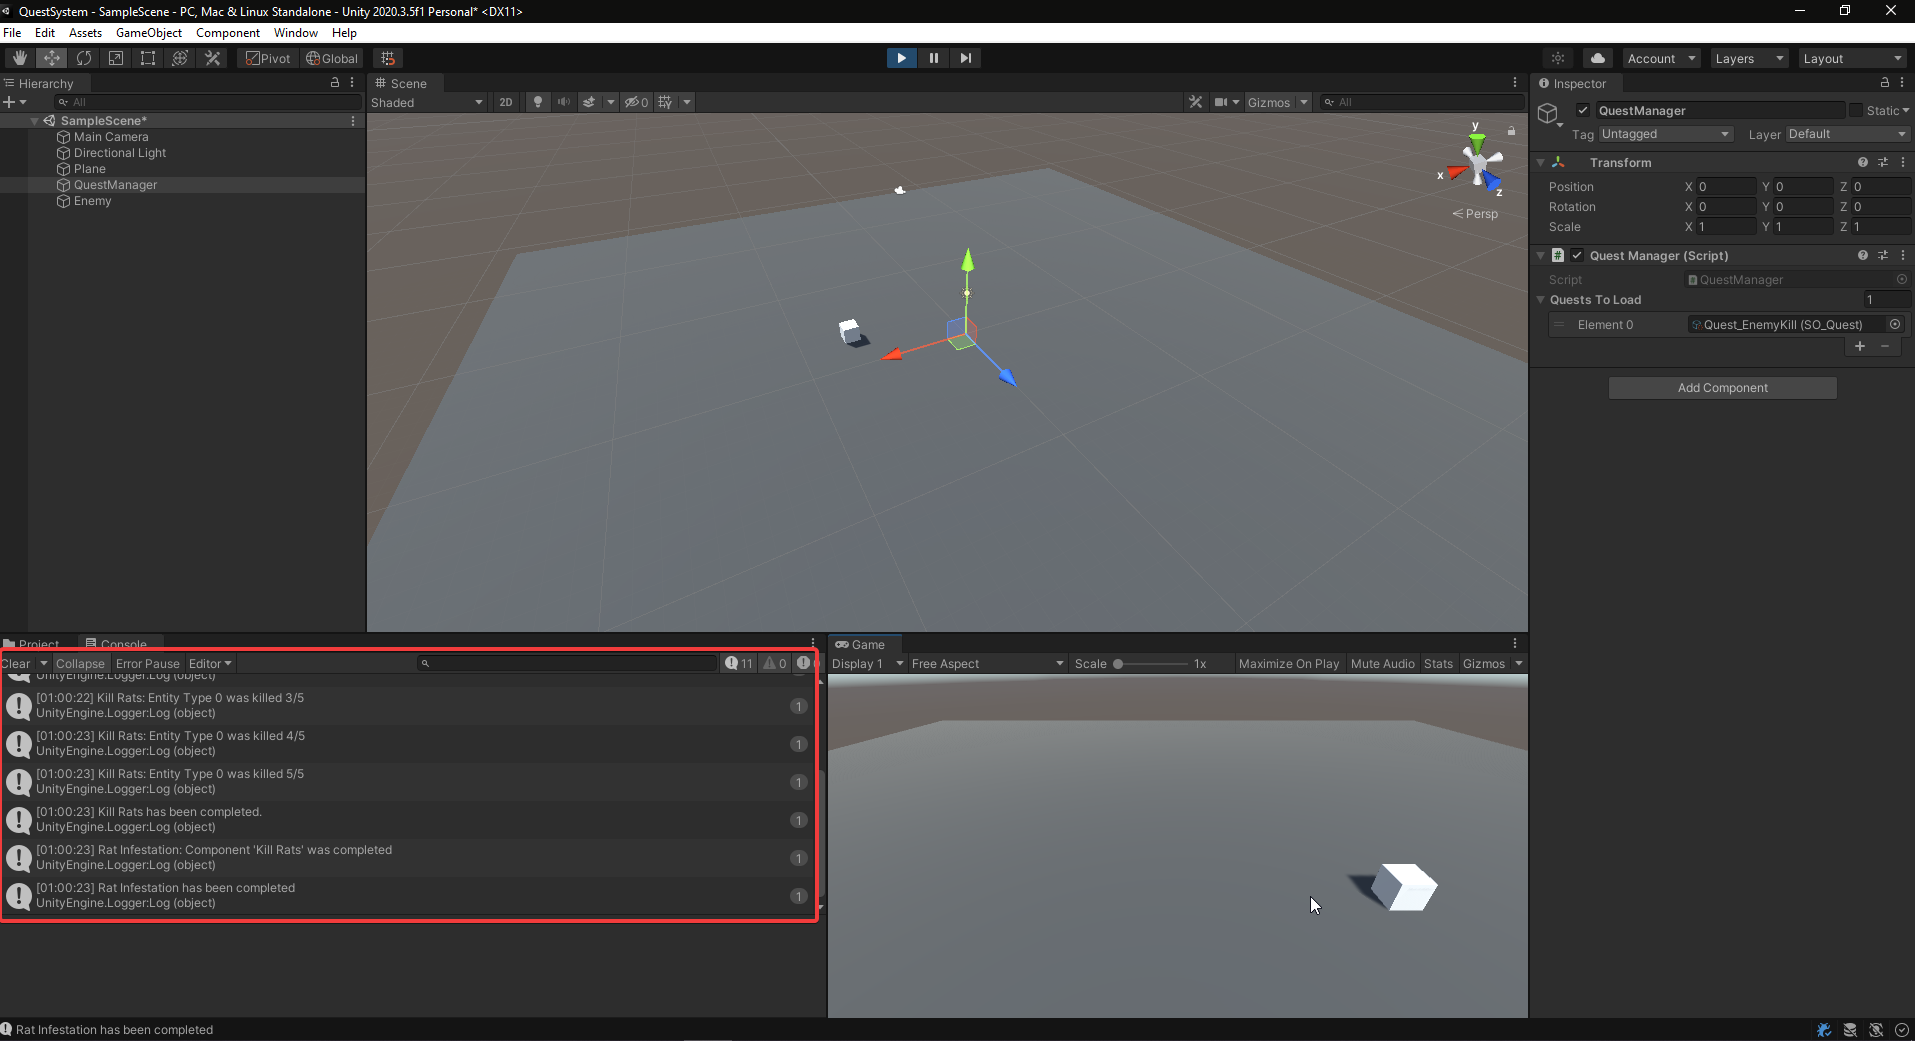
Time to test the quest :D I threw 6 "rats" into the scene and hoped for the best!
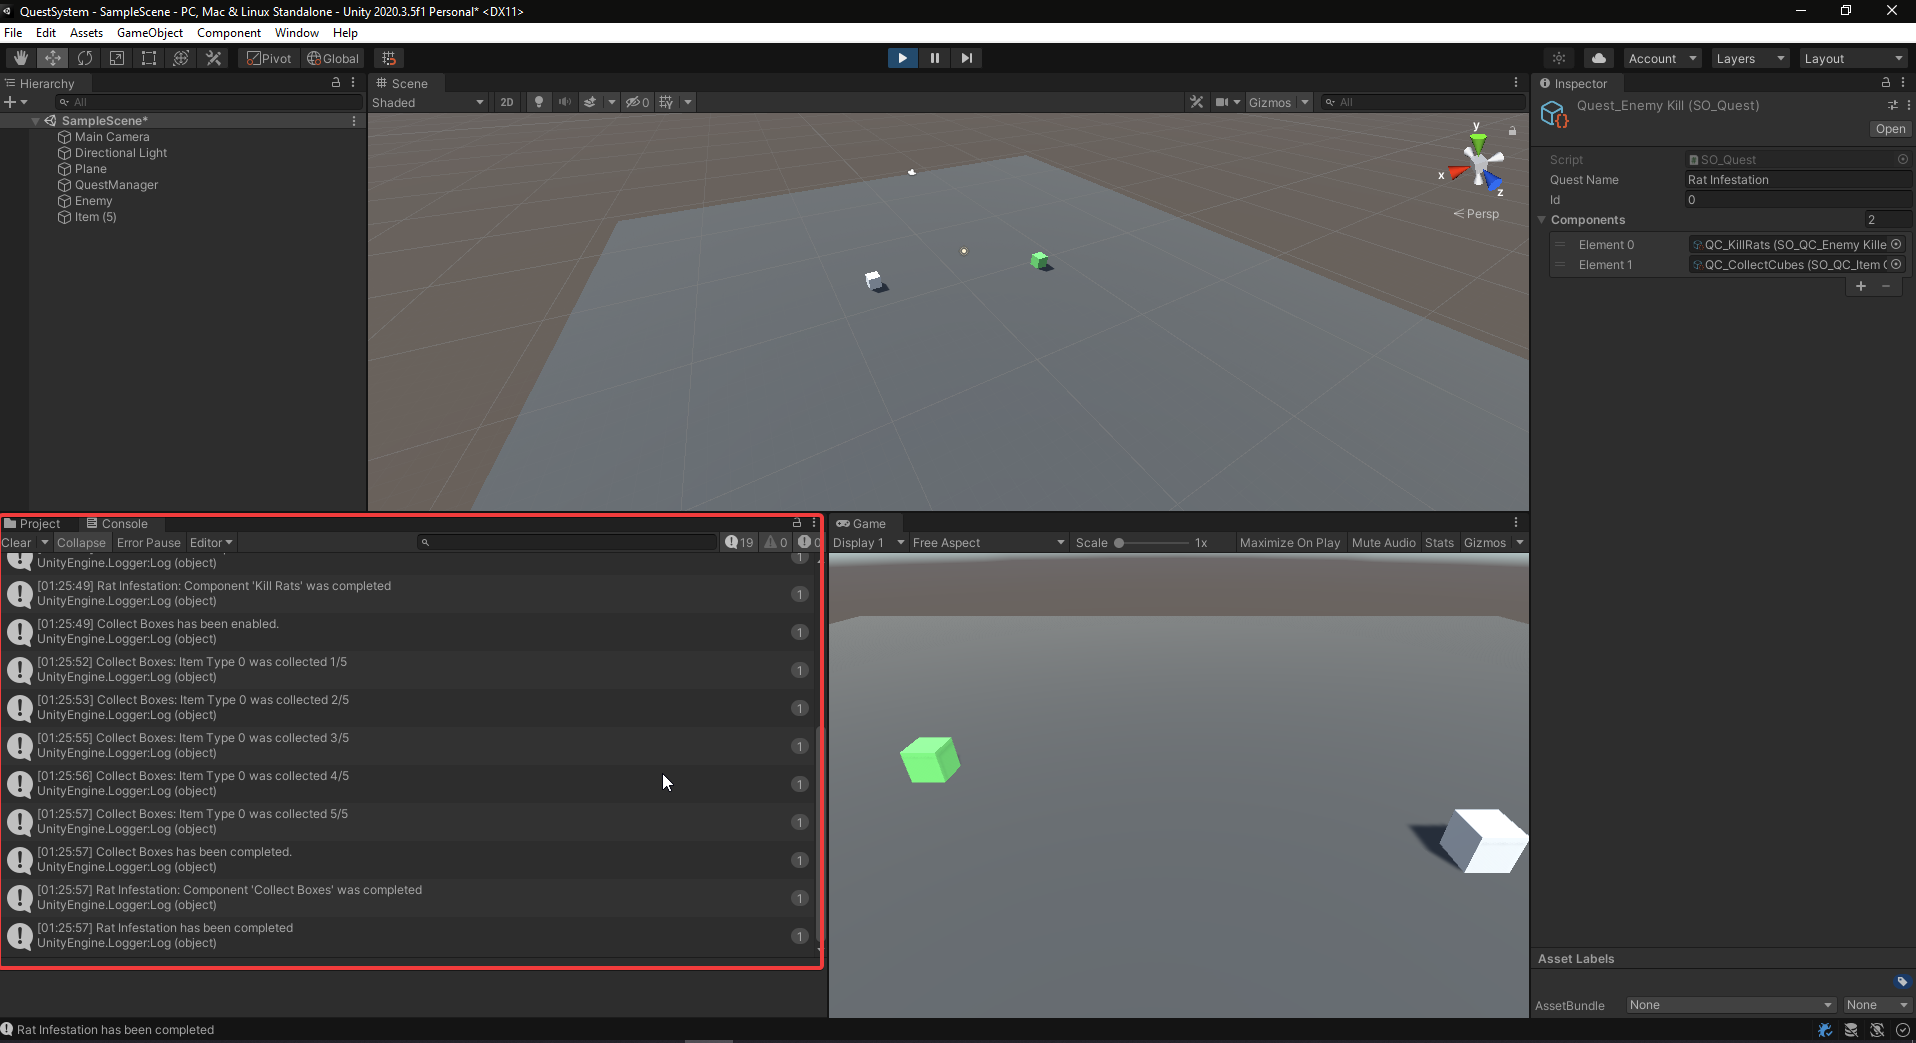
Everything is working perfectly. If you were to change the ID of the enemy, it would not work (as intended).
BONUS - Item Collected
I did mention that we had two component examples. Now that enemy killed is done. We can simply create a couple of classes and events to get literally anything else tracked by our quest system. I am using the exact same approach for items at the moment.
The following code blocks should show items working. Warning: It is a copy-paste of the enemy
-
Item.cs
using QuestSystem;
using UnityEngine;

public class Item : MonoBehaviour
{
    [SerializeField] private int itemID;

    private void OnMouseDown()
    {
        QuestEvents.TriggerItemCollected(itemID);
        Destroy(gameObject);
    }
}
-
SO_QC_ItemCollected.cs
using UnityEngine;

namespace QuestSystem
{
    [CreateAssetMenu(fileName = "QC_ItemCollected", menuName = "QuestSystem/Components/QC_ItemCollected", order = 2)]
    public class SO_QC_ItemCollected : SO_QuestComponent
    {
        [Header("Item Settings")]
        public int itemID;
        public int itemAmountNeeded;
    }
}
-
QuestEvents.cs
public static event Action<int> OnItemCollected;
public static void TriggerItemCollected(int itemID) { OnItemCollected?.Invoke(itemID); }
-
Quest.cs
private readonly Dictionary<QuestComponent.QuestComponentType, System.Func<SO_QuestComponent, QuestComponent>>
		_componentFactory = new Dictionary<QuestComponent.QuestComponentType, Func<SO_QuestComponent, QuestComponent>>()
{
    { QuestComponent.QuestComponentType.EnemyKilled, QC_EnemyKilled.CreateFactory },
    { QuestComponent.QuestComponentType.ItemCollected, QC_ItemCollected.CreateFactory }
};
-
QC_ItemCollected.cs
using UnityEngine;

namespace QuestSystem
{
    public class QC_ItemCollected : QuestComponent
    {
        private int _itemID;
        private int _itemCount;
        private int _itemAmountNeeded;

        public QC_ItemCollected(string name, string description, int itemID, int itemAmountNeeded) : base(name, description)
        {
            _itemID = itemID;
            _itemAmountNeeded = itemAmountNeeded;
            _itemCount = 0;
            ComponentType = QuestComponentType.ItemCollected;
        }

        public static QuestComponent CreateFactory(SO_QuestComponent so_questComponent)
        {
            SO_QC_ItemCollected localQuestComponent = (SO_QC_ItemCollected)so_questComponent;

            return new QC_ItemCollected(
                localQuestComponent.componentName,
                localQuestComponent.description,
                localQuestComponent.itemID,
                localQuestComponent.itemAmountNeeded);
        }

        public override void EnableComponent()
        {
            base.EnableComponent();
            QuestEvents.OnItemCollected += ItemCollected;
        }

        public override void MarkCompleted()
        {
            base.MarkCompleted();
            QuestEvents.OnItemCollected -= ItemCollected;
        }

        private void ItemCollected(int itemID)
        {
            if (_itemID != itemID)
                return;

            _itemCount++;

            Debug.unityLogger.Log($"{ComponentName}: Item Type {_itemID} was collected {_itemCount}/{_itemAmountNeeded}");

            if (_itemCount < _itemAmountNeeded)
                return;

            MarkCompleted();
            TriggerComponentCompleted(this);
        }
    }
}
And that's it! I've modified the first quest to also include the new ItemCollected component by adding it to the quest's list of components. See it working below!
That is everything for this long tutorial! I hope you found it useful. Again, feel free to contact me by email or social media if you wish to discuss this system further. I am debating creating a custom editor for this as well or simply expanding the system to include more useful scenarios.
Credit to Joshua Mobley for setting up the factory pattern to avoid a switch case statement that would have been way too long.
Thank you for reading this tutorial!
